Showing posts with label Guide. Show all posts

Friday, December 6, 2013

Beginner Guides : All Info you need For Xperia M - All Variants


Introduction:-

Hello !!
This post is made for all you need before you begin something with your Xperia M , This post is inspired by DooMLoRD's Thread at xda !

Follow Me :-
On Facebook :- https://www.facebook.com/Noel.Macwan.SXD
On Twitter :- https://twitter.com/@noelmacwan1997

Disclaimer:-

I'm not taking any responsibility if you brick your device while you do any modifications which is mentioned below !
You are doing this your own risk.
Skip this , If you don't want to brick your device ..
Although its tested but if you will play with files in this mod then Its over you. 
I Hope you have read this carefully, Now move to next steps :

Index Of This post :-

  • Basics
  • Definition And Info Section 
  • How-to Guides
  • ROMs And Kernels For Xperia M
  • Many More Soon ...


Basics


Types of Boots

  • Normal - just press power button and device starts booting
  • Flashmode - this mode is used to flash stock OFFICIAL firmware using flashtool, denoted by GREEN LED 
  • Fastboot mode - this is a special mode, denoted by BLUE LED, used when we want to flash custom kernel, custom system images, for that we need to unlock bootloader, i will tell more details about this later...
How to boot your device in various types of boot

Power Off your device first then 

Volume Up + USB cable connected to PC -> FASTBOOT MODE (BLUE LED will light up)

Volume Down + USB cable connected to PC -> FLASHMODE (GREEN LED will light up)

Definition And Info Section 

Firmware:

Firmware refers to the applications and operating system that control how a cellphone or smartphone operates. It is called firmware rather than software to highlight that it is very closely tied to the particular hardware components of a device. Firmware is generally flashed into a phone's ROM rather than simply being loaded into normal phone storage, where it could more easily be erased and lost in the event of a crash. Firmware updates are sometimes provided by a company as a way to fix bugs or introduce new functionality. 


Flashtool :

Flashtool is a S1 flashing software that works for all Sony phones from X10 to Xperia Z Ultra. They all use the S1 protocol for flashing firmwares.
This program was originally made to flash sin files downloaded by SEUS or PCC. From time to time, sin files have been bundled into what is now well known FTF (Flash Tool Firmwares). That is the core of Flashtool and the reason of its name.
Flashtool can also easily unlock the bootloader of the phone using the BLU icon as far as the bootloader of your phone is unlockable
The flashing feature as well as bootloader unlock feature are available whatever the phone is recognized or not by the application. What is only mandatory for flashing is to own the FTF file according to the device you want to flash it on.
Why should I use flashtool ?
  1. Once bootloader unlocked, official sony tools do not work anymore.
  2. Using official sony tools, you can only upgrade. No downgrade possible.
  3. Using flashtool, you can choose what to flash and what not to flash. This said, many rooting scenarios are available implying kernel only downgrade to retrieve a patched rooting exploit and then flash back the right kernel.

Bootloader:
The bootloader configures the device to an initial known state and has a means to select where to start executing the kernel. It can allow you to make this selection, which give you for example the opportunity to start an alternative Linux kernel, or Windows. Because the bootloader is an essential component of the boot process, it is stored in non-volatile memory, such as flash memory. Bootloaders are written by hardware vendors and are specialized for the hardware they run on. 

Root:
Rooting mounts of your system as writable so that you can make any modifications and gives you ability to alter or replace system applications and settings, run specialized apps that require administrator-level permissions, or perform other operations that are otherwise inaccessible to a normal Android user. On Android, rooting can also facilitate the complete removal and replacement of the device's operating system, usually with a more recent release of its current operating system. 

Kernel:
One of the kernel's main functions is to control the hardware. When software needs the hardware to do anything, it sends a request to the kernel. From the brightness of the screen, to the volume level, to initiating a call through the radio, even what's drawn on the display is ultimately controlled by the kernel.  . Both the hardware and the software communicate both ways with the kernel, and that's how your phone knows when to do something.  
ClockworkMod Recovery (CWM)
is a replacement recovery option for Android devices, made by Koushik "Koush" Dutta. Features include Nandroid backup, adb shell, advanced update.zip options (ignore asserts and signature checks), and file browser for choosing update.zips
The Rom Manager app may be used for installing CWM, overwriting the device's stock recovery. As with the stock recovery, CWM can apply software changes to the device. Unlike the stock recovery, CWM is able to entirely replace the device's primary Android operating system ("flashing a new ROM"), including with aftermarket replacements such as CyanogenMod. Once installed, CWM it is accessed by turning your phone off, then triggering the bootloader prompt by holding down some device-dependent button combination as it is turned on.
 
Zipalign:
zipalign is an archive alignment tool introduced first time with 1.6 Android SDK (software development kit). It optimizes the way an Android application package (APK) is packaged. Doing so enables the Android operating system to interact with the application more efficiently, and hence has the potential to make the application and overall the whole system much faster. Execution time is minimized for zipaligned applications, resulting is lesser amount of RAM consumption when running the APK  

Deodex :
Deodexing is basically repackaging of these APKs in a certain way, such that they are reassembled into classes.dex files. By doing that, all pieces of an application package are put together back in one place, thus eliminating the worry of a modified APK conflicting with some separate odexed parts.

In summary, Deodexed ROMs (or APKs) have all their application packages put back together in one place, allowing for easy modification such as theming. Since no pieces of code are coming from any external location, custom ROMs or APKs are always deodexed to ensure integrity.  


Noel Macwan
Author/ Admin @ SXDevelopers !


Friday, October 11, 2013

[GUIDE] Root Jelly Bean 4.2.2 Build : 15.2.A.1.12 : CE in Xperia M and Xperia M dual


Introduction:-

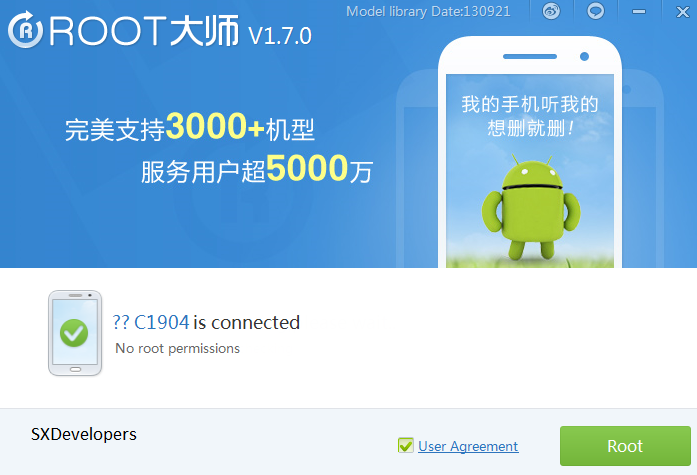
Hello Friends .. I have shared you a guide to root Jelly Bean 4.2.2 in Xperia M/Dual - C1904/C1905/C2005/C2006  and this guide is very useful for all and as well as for starters too ...
This tool works for lock bootloader and as well as unlock bootloader

 Disclaimer:-

I'm not taking any responsibility if you brick your device while rooting your device
You are doing this your own risk.
Skip this , If you don't want to soft brick.
Although its tested but if you will play with files in this mod then Its over you. 
I Hope you have read this carefully, Now move to next steps :

Requirement :-
ADB Drivers
Vroot

Instructions :-
 
 Click Here to Download Firmware !!

First of all download vroot from Here !!
install it 
then connect your phone with USB debugging on  
  Open Vroot And Click on "Root"
 Wait for some mins 
After it , you have root your device

Check whether you have got Superuser app in your device or not 
 And you are done !!


I Hope that this Guide and post helped you

Please Don't Steal My Works or Share/ Add them in your Roms without taking permissions from me . 

Regards 

Noel Macwan
Author/ Admin/ Recognized Themer/ Recognized Contributor 


Tuesday, September 3, 2013

[GUIDE][HOW-TO] Mod Flyme OS Status Bar

  Screenshot taken from Flyme OS port , not from moded systemui **

Hello MIUIers ..
In this thread i have showed you that how to mod systemui which looks like flyme os systemui for your rom ..
it's simple ... and by this guide your doubts will be solved , also its good for newbie also .


So , What you need ?
-> Apktool

-> Notepad ++
-> Basic Compiling And Decompiling Knowledge
-> apks from your ROM
-> A active mind that can work and follow with this guide


Here you go , get ready and take a long breath and start developing


First , pull systemUI.apk  in the folder system / app and  framework-res.apk and SemcGenericUxpRes.apk in system / framework into apktool's folder
Now you will get apks that you need ...

Run apktool Command Prompt (.batch) and install framework files and systemui that you are gonna to mod ..

type :
apktool if framework-res.apk
then press enter

then type
apktool if SemcGenericUxpRes.apk
then press enter

then type (For Stock or Stock based firmare)
apktool if SystemUI.apk
or
(For MIUI firmware)
apktool if MiuiSystemUI.apk
So, you have installed all the apks

Now, you need to decompile systemui
Type this to decompile
apktool d  SystemUI.apk
or
apktool d MiuiSystemUI.apk
Okay , you have decompiled systemui !

Get Ready to mod ....

Open Status_bar.xml from SystemUI/res/layout/ or MiuiSystemUI/res/layout/

Now compare this code with your .xml
<?xml version="1.0" encoding="utf-8"?>
<com.android.systemui.statusbar.phone.PhoneStatusBarView android:orientation="vertical" android:background="@drawable/statusbar_costum_background" android:focusable="true" android:fitsSystemWindows="true"  android:descendantFocusability="afterDescendants"
  xmlns:android="http://schemas.android.com/apk/res/android"
  xmlns:systemui="http://schemas.android.com/apk/res/com.android.systemui">
    <LinearLayout android:orientation="horizontal" android:id="@id/icons" android:paddingLeft="6.0dip" android:paddingRight="6.0dip" android:layout_width="fill_parent" android:layout_height="fill_parent">
                <ImageView android:gravity="left|center" android:id="@id/carrier_logo_id" android:layout_width="wrap_content" android:layout_height="fill_parent" android:src="@drawable/carrier_logo" android:scaleType="fitCenter" android:adjustViewBounds="true" />
                <LinearLayout android:orientation="vertical" android:paddingLeft="6.0dip" android:paddingRight="0.0dip" android:layout_width="fill_parent" android:layout_height="fill_parent">
            <LinearLayout android:gravity="right" android:paddingRight="3.0dip" android:layout_width="fill_parent" android:layout_height="0.0dip" android:layout_weight="1.0">
                                <com.android.systemui.statusbar.phone.IconPartitioner android:layout_width="0.0dip" android:layout_height="fill_parent" android:layout_weight="1.0">
                                        <com.android.systemui.statusbar.StatusBarIconView android:id="@id/moreIcon" android:visibility="gone" android:layout_width="wrap_content" android:layout_height="fill_parent" android:src="@drawable/stat_notify_more" />
                                        <com.android.systemui.statusbar.phone.IconMerger android:gravity="center_vertical" android:orientation="horizontal" android:id="@id/notificationIcons" android:layout_width="wrap_content" android:layout_height="fill_parent" />
                                </com.android.systemui.statusbar.phone.IconPartitioner>
                                <com.android.systemui.statusbar.policy.Clock android:textAppearance="@style/TextAppearance.StatusBar.Clock" android:textSize="16.0dip" android:gravity="left|center" android:id="@id/clock" android:layout_width="wrap_content" android:layout_height="fill_parent" android:singleLine="true" />
                        </LinearLayout>
            <LinearLayout android:paddingRight="3.0dip" android:layout_width="fill_parent" android:layout_height="0.0dip" android:layout_weight="1.0">
                <LinearLayout android:gravity="right" android:layout_width="fill_parent" android:layout_height="fill_parent">
                                        <LinearLayout android:gravity="center_vertical" android:orientation="horizontal" android:id="@id/statusIcons" android:layout_width="wrap_content" android:layout_height="fill_parent" />
                                        <ImageView android:layout_gravity="center_vertical" android:id="@id/stat_no_sim" android:background="@drawable/stat_sys_no_sim" android:paddingLeft="2.0dip" android:visibility="gone" android:layout_width="wrap_content" android:layout_height="wrap_content" />
                                        <com.android.systemui.statusbar.policy.Traffic android:textAppearance="@style/TextAppearance.StatusBar.Traffic" android:gravity="left|center" android:id="@id/traffic" android:layout_width="wrap_content" android:layout_height="fill_parent" android:layout_marginRight="2.0dip" android:singleLine="true" />
                                        <LinearLayout android:gravity="center" android:orientation="horizontal" android:id="@id/signal_battery_cluster" android:paddingLeft="0.0dip" android:layout_width="wrap_content" android:layout_height="fill_parent">
                                                <include android:id="@id/signal_cluster" android:layout_width="wrap_content" android:layout_height="wrap_content" layout="@layout/signal_cluster_view" />
                                                <TextView android:layout_gravity="left|center" android:id="@id/name_carrier_id" android:paddingLeft="2.0dip" android:layout_width="wrap_content" android:layout_height="wrap_content" android:text="@string/carrier_name_abal" android:singleLine="true" style="@style/StatusBarNotificationText" />
                                                <TextView android:layout_gravity="left|center" android:id="@id/battery_text" android:visibility="gone" android:paddingLeft="2.0dip" android:layout_width="wrap_content" android:layout_height="wrap_content" android:text="@string/status_bar_settings_settings_button" android:singleLine="true" style="@style/StatusBarNotificationText" />
                                                <ImageView android:id="@id/battery" android:paddingLeft="2.0dip" android:layout_width="wrap_content" android:layout_height="wrap_content" />
                                        </LinearLayout>
                                </LinearLayout>
                        </LinearLayout>       
                </LinearLayout>       
    </LinearLayout>
    <LinearLayout android:orientation="horizontal" android:id="@id/ticker" android:paddingLeft="6.0dip" android:animationCache="false" android:layout_width="fill_parent" android:layout_height="fill_parent">
        <ImageSwitcher android:id="@id/tickerIcon" android:layout_width="@dimen/status_bar_icon_size" android:layout_height="@dimen/status_bar_icon_size" android:layout_marginRight="4.0dip">
            <com.android.systemui.statusbar.AnimatedImageView android:layout_width="@dimen/status_bar_icon_size" android:layout_height="@dimen/status_bar_icon_size" android:scaleType="center" />
            <com.android.systemui.statusbar.AnimatedImageView android:layout_width="@dimen/status_bar_icon_size" android:layout_height="@dimen/status_bar_icon_size" android:scaleType="center" />
        </ImageSwitcher>
        <com.android.systemui.statusbar.phone.TickerView android:id="@id/tickerText" android:paddingTop="2.0dip" android:paddingRight="10.0dip" android:layout_width="0.0dip" android:layout_height="wrap_content" android:layout_weight="1.0">
            <TextView android:textAppearance="@style/TextAppearance.StatusBar.PhoneTicker" android:layout_width="fill_parent" android:layout_height="wrap_content" android:singleLine="true" />
            <TextView android:textAppearance="@style/TextAppearance.StatusBar.PhoneTicker" android:layout_width="fill_parent" android:layout_height="wrap_content" android:singleLine="true" />
        </com.android.systemui.statusbar.phone.TickerView>
    </LinearLayout>
</com.android.systemui.statusbar.phone.PhoneStatusBarView>
Next,
open folder SystemUI\smali\com\android\systemui\statusbar\policy or MIuiSystemUI\smali\com\android\systemui\statusbar\policy
copy and paste
Traffic$1.smali
Traffic$2.smali
Traffic$3.smali
Traffic$SettingsObserver.smali
Traffic.smali

Now,
open open ids.xml in folder SystemUI/res/value/ids.xml or MiuiSystemUI/res/value/ids.xml
add this code :-
  <item type="id" name="traffic">false</item>
    <item type="id" name="carrier_logo_id">false</item>
    <item type="id" name="name_carrier_id">false</item>
This is hide Traffic Icon , Carrier Logo and Carrier Name

add this code above  </resources>
it should look like this :
<item type="id" name="traffic">false</item>
    <item type="id" name="carrier_logo_id">false</item>
    <item type="id" name="name_carrier_id">false</item>
</resources>
Now, open strings.xml  in folder SystemUI/res/value/strings.xml or MiuiSystemUI/res/value/strings.xml
and add this code just above </resources> :
<string name="carrier_name_abal">Write Your Text Here !</string>
this will add custom carrier name : Replace your text with "Write Your Text Here !"

Okay , now open styles.xml  in folder SystemUI/res/value/styles.xml or MiuiSystemUI/res/value/styles.xml
And add this code just above </resources>  :
<style name="TextAppearance.StatusBar.Traffic" parent="@*android:style/TextAppearance.StatusBar.Icon">
        <item name="android:textSize">14.0dip</item>
        <item name="android:textStyle">normal</item>
        <item name="android:textColor">#ffffffff</item>
    </style>
This will design your systemui look like Flyme OS

And Now you just need to add custom carrier logo
open folder SystemUI\res\drawable-hdpi or MiuiSystemUI\res\drawable-hdpi and paste your logo and rename it to carrier_logo.png

So, you have done moding with SystemUI
now you need to recompile it

Run apktool and enter this code :
apktool b SystemUI
press enter and it will now recompile
now open the moded systemui and original systemui , you need to now sign the apks
so copy META-INF and AndroidManifest.xml from original apk and paste it into your moded apk
and set compresstion : Store
So the things with systemui is done !

Now lets start to mod framework

So, Decompile framework
Run apktool and enter this code :
apktool d framework-res.apk
and open dimens.xml

and find
<dimen name="status_bar_height">25.0dip</dimen>
and replace with this :
<dimen name="status_bar_height">40.0dip</dimen>
Again, find this code :
<dimen name="status_bar_icon_size">25.0dip</dimen>
and replace with this :
<dimen name="status_bar_icon_size">30.0dip</dimen>
This moding will change the systemui icon size

So, this only thing you need to do with framework now recompile it

Run apktool and enter this code :
apktool b framework-res
press enter and it will now recompile
now open the moded framework and original framework , you need to now sign the apks
so copy META-INF and AndroidManifest.xml from original apk and paste it into your moded apk
and set compresstion : Store

DONE !!
Now you have succesfully moded Flyme OS systemui for your ROM

Now just push it in our device !

I Hope you have Sucesfully Done

Credits :
                                        zie.do2y for the guide
unsecured loans mortgage us bank mortgage rates business plan auto insurance quote online auto loans mortgage refinance holiday insurance company personal loans auto accident financial business opportunitues management accounting canon camera dell laptops toshiba hp pavillion laptop deals. investment opportunities immigration lawyers insurance coverages data recovery denver data recovery los angeles student loans. conference calling companies loan consolidation rates los angeles criminal defense attorney car insurance online lung asbestos affordable insurance home refinance term insurance quotes samsung android nokia android phone sony android iphone 5 new iphone samsung galaxy sony experia iphone air hp laptop dell laptop sony laptop asus laptop hp pavillion dell inspiron touch screen ultrabox cheap laptop best laptop hd laptop android mobile phones tecno android phones android smart phones virgin mobile android phones android tablet best android tablet pc 10 inch android tablet android tablet computer capacitive touch android tablet verizon iphone 4 discount laptops computer laptops best laptops for college students laptops notebooks lenovo laptops ideapad acer laptops touchscreen laptops computers apple laptops best buy laptops laptops reviews business laptops ultrabooks laptops computers tablets cheap mini laptops toshiba laptops best buy sony vaio laptops best buy best small business laptops buy global business opportunities small business opportunities business opportunities online business opportunities internet business opportunities mortgage and insurance business career opportunities candidates job business exact


Copyright @ 2013 Droid Area.